Rumi
Caravan Tiny Travel Trailer
Designed and built by: Henry Benner,
July 14, 2010
Copyright © 2010,
Henry Benner, All Rights Reserved
eMail:
[email protected]
Last updated: September 7, 2011
THIS
PROJECT BEGAN ONE DAY when I realized that my gas guzzling Chevy truck
and camper was just too expensive for the environment. So I bought a
small
fuel-efficient car and scrapped the truck and camper. This trailer is
the replacement for the camper.

The
trailer provides a comfortable bed (double) in a wind-tight and
insulated shell; plentiful and convenient storage, a toilet, a
desk/table, a mini kitchen with single burner propane stove, sink,
insulated water jug, electric
heater, and an alcohol heater.
It works well in conjunction with a portable gazebo and regular camping
equipment.
It weighs only 415 pounds (189 kg) so it can be towed by a
small car. If you build it yourself it will probably cost less than
$1500 USD.
It
also doubles as a utility trailer; wide enough to transport 4x8 sheets or items too large or awkward for the car. (The entire
rear panel is removable.)
Like my old truck camper, the trailer
is very convenient for traveling–there is nothing to setup and it's
completely self-contained so no campground is required. On a long trip
just park overnight on a quiet street, on vacant land, or at a rest
stop.
This website describes the construction of the outer shell.
Specifications
| Overall width (excluding
fenders) |
53 inches |
| Overall length (excluding
drawbar, with drawbar) |
130, 158 inches |
| Interior width |
50 inches |
| Interior floor length |
120 inches |
| Exterior height |
73 inches |
| Interior height (highest,
lowest) |
56, 42.5 inches |
| Weight (with hitch jack, without jack) |
415, 400 pounds |
| Cost to build (trailer,
shell materials) |
~$1200 ($560, $620) |
| Windows, door hinge |
from an old truck camper |
| Trailer, lightweight
tubular |
Snowbear
480K, minor
modifications |
Estimated time to build
(excluding trailer assembly, aquiring materials, or
painting) |
45 hours |
Construction Details
Drawings (click on
links)
Technical
Drawing of Framing
Double
Bed Floor Plan
Single
Bed Floor Plan
Walls
The walls are bolted directly to the sides of the trailer
frame and are hollow construction throughout.
A
simple method to build the wall frame is by using a construction panel.
This allows you to work vertically and eliminates tricky
clamping.
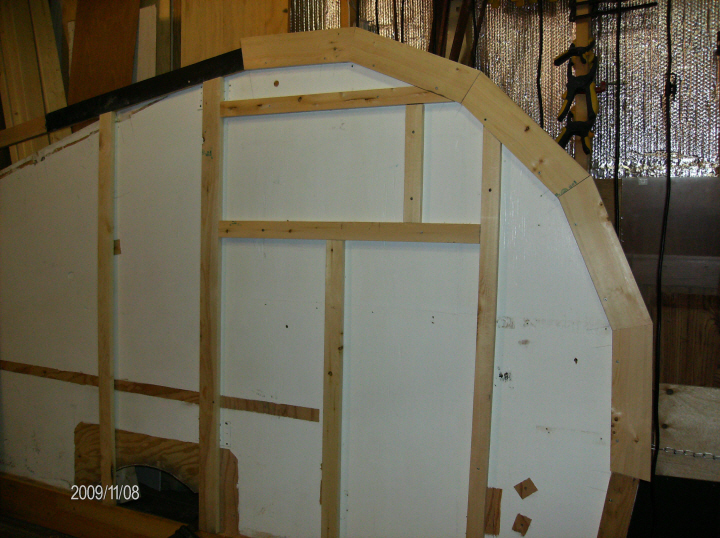
To build the construction panel join
sheets of OSB or plywood together with metal roof truss plates and
cut it to the outer shape of the trailer. Paint both sides white
(optional). Support the panel vertically.
Draw your plans directly on the construction panel. The panel in
the photo was the plywood wall from a prototype
trailer.
Framing
members are either 1½”, 2½”, or 3½” wide, all ¾" thick--installed
on the flat. Standard lumber sizes
(1x2, 1x3, 1x4) could be used but it's better to buy the best
quality stock, regardless of width and/or length, and rip the required
sizes with a table saw. Use pieces that are as clear as possible
(knot-free).
Frame in the door, windows, and fender supports. Add lots of
structural strength where the walls bolt to the trailer
frame. The bottom of the frame is level with the top of the axle so a
cutout will eventually be required to allow for axle movement.
Screw
the framing
members to the construction panel with small screws. Don't be too
concerned if your joints are not tight--the glue will bridge small
gaps. When you have finalized the structure place some wax paper
between each joint and the construction panel, then glue and
gusset each piece in
place.
A very good glue for this application is a
Polyurethane
Construction Adhesive such as LePages PL Premium
or
equivalent. This glue bonds to wood, metal, plastic and is perfect for this
application–having excellent adhesion and remaining flexible.
Use
gussets on each joint for added strength. These are small strips of
thin metal roof flashing stapled or nailed over each freshly glued
joint–let the
glue squeeze out from under the gusset. (To ensure glue will stick to
metal clean it with thinner and roughen with emery
cloth or sand
paper before cutting into strips.)
Wipe off excess glue with a rag
and
paint thinner.
After the glue dries trim frame to the curve with a
jigsaw
(or,
before gluing, trace the curve onto each segment piece, remove
from panel, cut with bandsaw).
When glue has cured sufficiently remove frame
from the construction panel and install the backside gussets with glue
and staples or brads.
The
final result is amazingly strong. Framing members can also be easily
added or removed.
Using a 1x6 board along the bottom instead of a 1x3 simplifies
construction but adds unnecessary weight.
Reverse the construction panel to build the other wall.
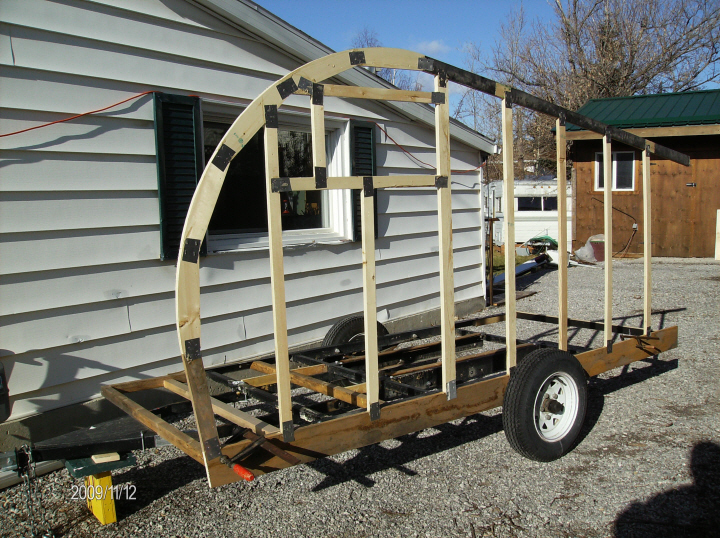
Trailer Notes:
- The
trailer in the photo above is a Snowbear 480K. It's a
standard 4
foot by 8 foot utility trailer (bolt-together kit) with a lightweight (200
lb) tubular frame. The supplied 8 inch wheels were replaced with 12
inch ones. The
drawbar was relocated 12
inches forward for better weight distribution.
- Some
wood crosspieces and extensions were added for extra floor support and
to accommodate the rear panel.
- Trailers that have
the axle located 60/40 (40% from the rear) are just about right.
Hitch weight should be 10%-15% of
gross trailer weight for
proper towing. And backing up is easier when the axle is located towards the rear.
- Almost
any lightweight
trailer will serve. Check out canoe trailers or other boat trailers.
- For a low deck get a trailer with the springs slung under
the axle.
- Shock absorbers would be beneficial.
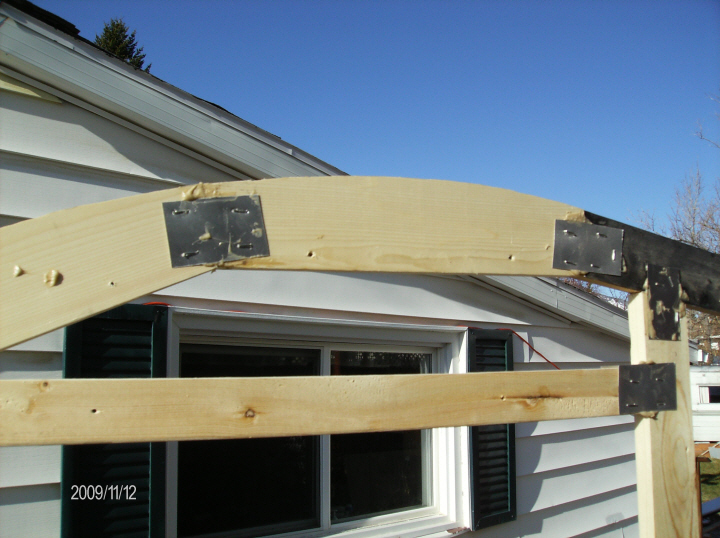
Roof Spars
The
roof spars are fabricated from clear spruce lumber 2½”
wide by
¾” thick by approximately 50” long (measure to get
the exact length). At each end a right-angle furniture bracket
(Stanley 08-8894) was attached with machine screws. Put some carpenters
glue on the threads at final installation.

Install
the first and last spars at the ends. Then locate the remainder
approximately 16” center to center. Consider where the crown roof skin
will be located before finalizing the location of the spars. Locate
another
spar over rear panel framing. Refer to the drawing. Photo is of a
plywood prototype, this trailer uses the same technique for the spars.
Install triangular blocks at the rear in the
corners of roof spar and side frame to support the tail lights and to
add stiffening (or use a metal right-angle bracket if lights are going
to be mounted outboard).

Roof Skins
Roof skins are ⅛” marine plywood.
Skins overlap each other and overhang the outside walls approximately ¼
inch. Double up the thickness
at the rear of trailer by adding an 8” strip of thin plywood. Apply a
bead of caulking along the roof spars,
roof edges, and on overlaps. Use ratcheting tie downs lengthwise over
the roof to hold the
curved skins in place while fastening. If necessary dampen
skins with water before bending. (Laying skins on wet lawn works well.)
Fasten with #9 roof screws
(every 8 inches). Be sure to install screws at right-angles to the
surface or the rubber gaskets will not seat properly.
Insulate
the inside of the roof and curve with single-sided foil radiant barrier insulation.
The
foil faces the empty
cavity between the spars (foil needs a minimum 5/8" air-tight space to
be effective). This will provide R-5 insulating value as
well as providing a good radiant barrier (i.e. acts like a heat
reflector). Support the wrap on the spars
with strips of ⅛” plywood or double-sided tape and caulk or tape along the edges to make it air-tight.
Door, Floor, Rear Panel, and Trim
Examine
a standard house exterior door
to get door frame and construction details (bear in mind that the
trailer
door opens outwards; plus, allow for a screen door mounted inside the
trailer door). Install a door sill and slant it forward so
that rain does not run inside. Use standard
door weather stripping and
lockset. Use a piano hinge if you can find one
that’s made for exterior use (from an old camper for example).
Install ⅜” OSB floor and baseboards as required. Seal
any gaps with expanding foam or Gorilla® tape. Most campsites have
power outlets on the road side of trailer sites so install a power bar
or power cord through the floor at the front on the road side.
Here's
an alternate light-weight floor idea: Stretch and fasten light steel
mesh across the frame of the trailer. (Some stores refer to this mesh
as Hardware Cloth.) Cover
with 2' squares of interlocking garage floor pads. These pads are made
of light but tough foam. I've seen them at Walmart in the automotive
department. Unfortuately I haven't had a chance to try this out
yet...so you're on your own here. This would probably save 10 to 15
pounds over an OSB floor.
Install
exterior panels (⅛”, or ¼” plywood) with #5 or #6 roundhead
screws (spray painted white) every 16 inches and around the door frame.
Fill cracks or gaps with white paintable caulking. Install the
windows.
Build
the rear panel. Panel is bolted to the back with four #10 or ¼
inch bolts
and shakeproof hardware. Install a gasket or weather stripping to seal
it.
Tail
lights are attached to blocks
screwed into the corners of the wall and roof structure members. This
allows the trailer to be used as a utility trailer without the rear
panel in place. Or, mount the lights on the outside of the walls with
brackets. Don't forget to run a ground wire to each light.
Install ¾”x¼” spruce trim along bottom edge of exterior panels
to protect fragile edges. Install similar trim at rear to hide details.
Install sheet metal strips on bottom of framing where rear of
trailer could drag on steep driveways.
Fenders
Fenders are fabricated from two layers of ⅛”
skins. Pop-rivet one layer to four equally spaced metal strips (e.g.
brick ties) that have been bent into an ‘L’ shape and drilled. Bend the
fender into the shape you want and fasten to a piece of scrap plywood
to hold that shape. Then glue and clamp the second layer on top of the
first layer–hiding the pop-rivet heads. Coat the inside with black
roofing compound to waterproof it. Mount fenders offset from the
trailer wall with thin wood or plastic spacers and #10 machine
screws.
Finishing
Paint it; add colorful trim or decals; install lights and
you’re done!
Misc Notes
- To make it possible for this trailer to be towed by a low powered
car the design
was inspired by typical sailboat shapes...these are generally long and
narrow. Increasing
the width or height might adversely affect the roadworthiness
to the point where it's no fun towing it...especially into a head wind.
If you have any doubts regarding the ability of your towing vehicle it
might be advantageous to build a simple plywood prototype. This could
be as simple as a 'post and beam' style of construction (simply bolt
some 2x4's to the trailer frame and cover with plywood), then take
it for a ride under windy conditions.
- Towing was very easy with my small car (2007 Suzuki SX4, 2L,
143hp, 5-speed manual transmission) with more than enough power. The narrow
shape is great--no extra mirrors required.
Fuel-efficiency was reduced by about 26% (from 34
mpg
to 25 mpg, US
gallons). Little side movement in cross-winds. More about
aerodynamics here.
- If
you don't have much experience with woodworking, don't have a shop, or
are pressed for time try using the Alternate
Construction Method (see the next section).
- If you don't own a table saw it might be worthwhile to
purchase
one. The one used in this project was a hardware store "house brand"
costing less than $100. A mitre saw is
also very useful--again, under $100. If you are going to borrow a
friends table or mitre saw, offer to buy and use your own blades.
- Metal skins would be more durable; have trailer
painted at an autobody shop or leave it natural.
- Why the name Rumi
Caravan? Well, I love the poetry of sufi Mevlana
Jalaluddin Rumi, especially this one:
Come, come,
whoever you are.
Wanderer,
worshipper, lover of leaving.
Ours is not a
caravan of despair.
Come, even if you
have broken your vows a thousand times.
Come, yet again,
come, come.
- To honor Rumi and experience maximum creativity and
enjoyment from each step of the project, build it practicing inner stillness.
- Don't
get caught up in making it very fancy, after all, it's a
camping
trailer. Fancy woodwork and paint jobs are great but soon get scratched
and damaged. It won't be professional
looking,
but then again, you probably don't have access to the shop and tools
that professionals use. Make it your work of art--where "imperfections"
are part of the appeal (like the difference between a painting and a
photograph).
- What makes this trailer better
than a store-bought unit are all the little goodies
you add later--the hooks in just the right places, the LED
lights,
the shelves and drawers custom made for your stuff, the cute icons and
decals that make it quintessentially you.
- The
reason for the copyright is to prevent anyone from falsely claiming
ownership of the design or website. You are free to use this
information, but I'd appreciate credit if you refer to this material
(or just provide a link to this site).
- If
you plan to finish the inside, it will probably be easiest to build
from the inside out (i.e. install interior panelling and insulation
before installing the exterior skins).
Alternate Construction Method
This method was used to create the prototype trailer:
- Use standard exterior G1S solid plywood walls and doors.
- Use strap hinges on the doors--with foam
weatherstripping to seal it.
- Bed, table, seat, etc. are built-in and attached to the
walls for simplicity (optional).
Some pros, cons, tips regarding this method:
- Much faster to build, approximately half the time.
- Possible
to build without a shop, just space to store tools
and
materials, and a rain/sun
shade. Must be warm enough though--above 50 deg F overnight for proper
drying and curing. (One of my favorites: setup in a corner of the
parking lot at Home Depot or Lowe's, run in to buy material or rent
tools as you need them; even better if there is a Burger King or
Wendy's close at hand, and a movie theater too for afternoon
breaks.)
- Use acrylic paintable caulk instead of glue for fast
assembly.
- Windows or access doors/compartments can be installed at any time--even after unit is
built.
- No construction panel required.
- Plywood doors tend to warp, use a stiffener or fabricate a
standard thick door with frame.
- Much heavier, approximately 100 pounds more (for ½"
plywood).
- Plywood tends to crumble and/or separate with moisture and
vibration--marine plywood would be a better choice.
- Walls may need to be built up where spars,
windows, fenders, and
other structural items are fastened.
- Walls
are not insulated and will sweat
in cool weather or on cool nights--keep bedding away
from walls. Ceiling and curve can still be insulated. Floor could be
insulated. Fall/Winter/Spring camping will be limited.
- Walls are heavy and difficult to maneuver.
- Screws from the outside may protrude into the interior.
Ouch!
- Fastening to the edge of plywood is usually weak.
- Finishing the interior is simple--just paint!
- Built-in bed, desk, etc. detracts from usefulness as
utility trailer.
- More interior space (approx. 1" wider).
- Simpler tool requirements. Jig saw, drill, clamps, hand
tools.
- More difficult to make wind-tight unless a standard door and
frame is fabricated.
- When you're ready for The full Monty you can use the
walls as contruction panels for the hollow wall version.
More tiny travel trailer sites
Improvements
- For more storage space consider adding
long side boxes to replace the fenders. For the Snowbear
trailer they could be 16"H x 72"L x 7.5"D. These could be accessed from
the interior or exterior (or both) as desired. To improve aerodynamics consider 'skirting in' the wheel wells. The 'skirts' could be hinged at the top to double as small roadside tables.
- To strengthen and waterproof roof and curve consider a penetrating epoxy such as Rot Doctor.
- A wheeled swivel hitch jack is well worth the extra 15 pounds.
- A
curbside fold-down table or shelf is very handy.
- A
sliding rain/sun-shade mounted on the roof that pulls out over the
curb-side of the trailer. Could be as large as 54" x 80" to create a
sheltered space for sitting, cooking, etc.
- A fold-away awning/shade for the roadside window. It could be a framed solar panel.
- Small
light-weight 12 volt power pack. Charged from solar panel, car, or house. For powering
small appliances, music players, LED lights, etc. Lithium-ion batteries
are the lightest--get them from old laptop computers--usually only one
cell goes bad and the whole battery pack is thrown away. I've cut open
the battery packs and mixed and matched individual cells to get 12v and this works fine.
- A road-side slide-out to accommodate a side-ways bed. Also doubles as fold-up sofa. Dramatically increases 'living space'.
More Pictures
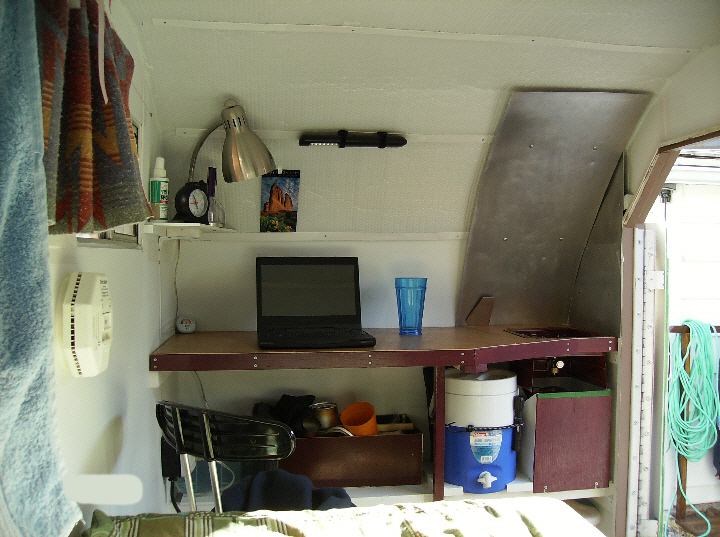
Interior
view. Shows the small desk/table, single burner propane canister stove
with heat shield. Used a folding army-style cot and 5" foamy on this trip. Lived with
this configuration for 6 weeks in the winter of 2010-11 on the desert near Las Vegas. A bit
cramped... trailer was not really designed for long stays... but it worked Ok once I adapted to the small space.
The planned new layout with side-slideout and folding couch/bed will
provide a lot more usable space.
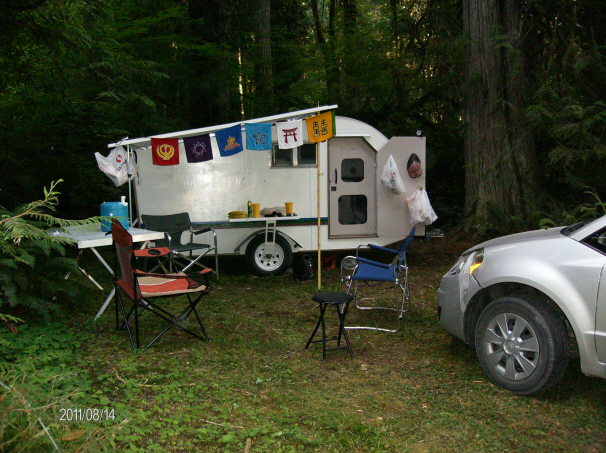
Attending Northwest Sufi Camp
at Camp Adams near Mt. Hood, Oregon. Trailer is so light-weight it was
rolled into a sweet little shady alcove by hand. With the
prototype slide-out
awning and the fold-up side table. Leaving the back panel door
partially open makes for great flow-through ventilation (a screened
frame was
inserted in the opening). Hit a deer on the trip, hence the duct
tape to hold my car together. I've now accumulated more than 40K
miles on the little trailer, and have saved a pile of money on
accommodation. Plus it's great for travelling because you can take
long breaks during the hottest part of the day and drive in the morning
and
evening when it's cooler.
There's a lot of interest in these small trailers, so be prepared to give tours!
Free Camping Sites:
Free and almost free...